Running the Full Enchilada
After the Application has run its jobs for the first time the system will email you.
After that, the system will run its analysis jobs daily at the time you specified during setup. During these daily jobs the system will analyze only recently changed opportunities and campaign responses and then roll those changes into the Campaign data.
From time to time, like after you’ve made changes to your currency management setup, or the setup of the Campaign Influence Analyzer, you may want to re-do analysis of all the opportunities and campaigns.
For this, you will need to run what is called the “Full Enchilada”.
To run the Full Enchilada:
• Go to the Control Panel page
• Then click this button at the bottom of the page.

• And then check this box:
![]()
• And finally, click this button:

Omit some Campaigns, Opportunities, Responses or Contacts from analysis
It may be beneficial for some organizations to manually or systematically omit from campaign influence analysis some opportunities, campaigns and/or campaign members or contacts.
For example, you may have bookkeeping opportunities, like renewals, which you generally omit from sales and marketing reporting. Or you may have a specific campaign or set of campaigns that you run all the time for clients for something completely unrelated to generating sales (although you could make strong arguments that EVERYTHING is related to generating sales).
You will generally know already – right now – if you have any of these types of records in your org that you have to omit.
If you find yourself in this category, use the following directions to omit them from campaign influence analysis.
Check the checkbox field “Omit from Campaign Influence?”
The objects Opportunity, Campaign, and Campaign Member each have a custom checkbox field labeled “Omit from Campaign Influence?” (API name Camp_Inf__Omit_from_Campaign_Influence__c)
If you need to omit any individual records you can use the following methods:
• Check the box manually
• Check the box using a workflow rule
• Check the box on historical records with the data loader
For example, let’s say you want to systematically omit all campaign responses where the Contact Title equals “Blah”. You will want to create a workflow rule to automatically check the box for you on the Campaign Member object.
Here is the Salesforce documentation on creating workflow rules, if you are not familiar with the procedure.
In this particular case, you would put the workflow rule on the Campaign Member object and then select “created, and any time it’s edited to subsequently meet criteria”. Then choose in the Rule Criteria “Contact: Title” equals “Blah”. Then create a new Field Update to check the box “Omit from Campaign Influence?”
Once you’ve put the rule in place, you will want to update all your existing Campaign Membership records that satisfy the criteria with the box checked.
Once you’ve setup sufficient rules to omit all the Opportunities, Campaigns, Campaign Members (and contacts) and updated all the records for omission, you can configure the Campaign Influence Analyzer OR if you’ve already turned it on, you will need to reset all Magic Robot data & run the “Full Enchilada” to update the analysis to omit the records you’ve specified.
For more information about record-level omissions & overrides, visit:
https://help.magicrobot.com/record-level-overrides-and-exclusions/
For more information about resetting all Magic Robot Data & running the “Full Enchilada”, visit: https://help.magicrobot.com/resetting-all-magic-robot-data-running-the-full-enchilada/
Setting up your vendors
If you already have a vendor field for Campaigns, you will love this!
If you don’t, you can set up your campaign creation process to follow this best practice.
One of the benefits installing and using Magic Robot is access to the analysis it can provide. And one of its features is the ability to pivot based on the Campaign field “3rd Party Campaign Vendor”.
If you already use a picklist field for vendor, create a workflow rule to set the value of your field into the Magic Robot field 3rd Party Campaign Vendor using a formula in this manner: TEXT(Your_Picklist_Field__c)
Alternatively, if you don’t use a Vendor field already, Magic Robot strongly suggests you start using one! You can either use our free-form text field, or you can create a new picklist field and set Magic Robot’s with a workflow rule.
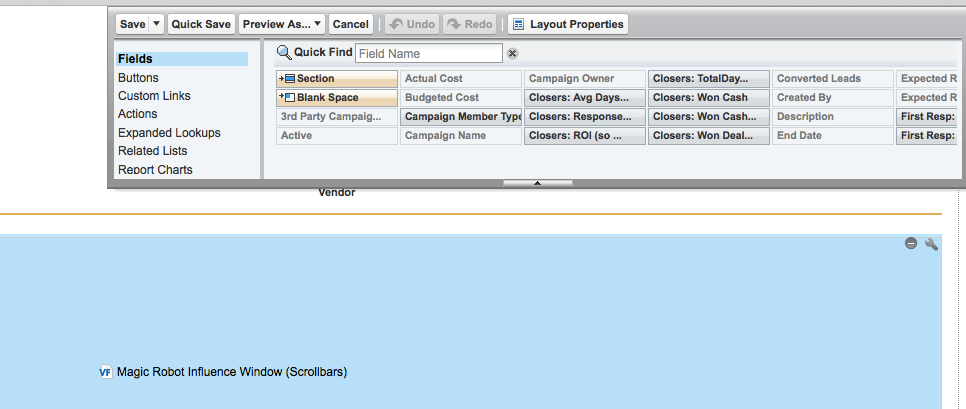
Setting up the campaign layout to show influence
You can either choose the Campaign w/Influence Layout OR you can add the page “Magic Robot Influence Window” as an inline Visualforce frame to your standard campaign layouts.
To add to your existing layouts:
1. Click Setup > Customize > Campaigns > Page Layouts
2. Click Edit next to the layout
3. Drag a new section. Select 1-column. Label it something like “Influence”
4. Select Visualforce Pages in the left column of the user interface elements palette
5. Select “Magic Robot Influence Window”, and drag it to the section panel
6. Click the wrench at set the height to 310 pixels. Do not check the box to display the label.
7. Click Save